Neptune Apex Integration GuideUpdated 3 months ago
The aF4 is compatible with the Neptune Apex aquarium controller via the 0-10v link port. Once connected, the Apex takes full control of feed scheduling — allowing you to program feeds, set frequency, and integrate feeding into your broader aquarium automation routines.
APEX CODE:
Fallback OFF
Set OFF
If Time 18:26 to 18:40 Then ON
If Time 19:30 to 19:40 Then ON
If Time 20:30 to 20:40 Then ON
This code will trigger a feed at 6:26 PM, 7:30 PM and 8:30 PM.
Compatible Apex models
The following Apex models are compatible with the aF4 via built-in 0-10v variable speed output:
- Apex Pro
- Apex 2016
- Apex Jr (older models with variable speed output)
Don't have a compatible model? The Neptune Systems VDM module adds compatibility.
The Neptune Systems VDM (Variable Dimming Module) adds 4 independent 0-10v variable speed ports to any Apex system via AquaBus — including newer Apex models and Apex Jr units that don't have built-in VarSpd ports. It is plug and play and automatically recognised by the Apex system.
The VDM is available at Bulk Reef Supply and other aquarium retailers. Note that interface cables are not included with the VDM and must be purchased separately — the inD Aquatics 0-10v splitter cable is still required to connect the VDM to the aF4.
Once the VDM is installed, follow this guide from Step 1 as normal — the VDM ports appear in Apex Fusion™ identically to built-in VarSpd ports.
Not sure if your Apex is compatible? Check whether your unit has a variable speed output port. If it does, it will work with the aF4.
What you'll need
- aF4 unit
- Compatible Neptune Apex
- inD Aquatics 0-10v splitter cable — available at indaquatics.com. This specific cable is required for the connection. Standard 3.5mm cables are not compatible.
How the connection works
The aF4's link port accepts a 0-10v signal. When the Apex sends a signal of 9–10V, the aF4 triggers a single feed cycle, dispensing the currently selected feed quantity.
Once the cable is connected, the Apex overrides the aF4's built-in 24-hour automatic feed schedule completely. All feed timing is managed by the Apex — the aF4's internal offset settings have no effect while the link port is in use.
The link LED on the top right corner of the aF4 button menu will illuminate solid when connected and flash green each time a feed signal is received (only on later SN 100XXX, prior FW will remain solid).
Setup steps
Step 1 — Purchase the correct cable
Order the inD Aquatics 0-10v splitter cable from indaquatics.com. Do not attempt to use a standard 3.5mm audio cable — the splitter cable is specifically designed for this connection.
Step 2 — Connect the cable to the aF4
Plug the 3.5mm end of the inD Aquatics cable into the link port on the aF4. The link port is located above the power cable input. The link LED should illuminate when the cable is seated correctly.
Step 3 — Connect the cable to the Apex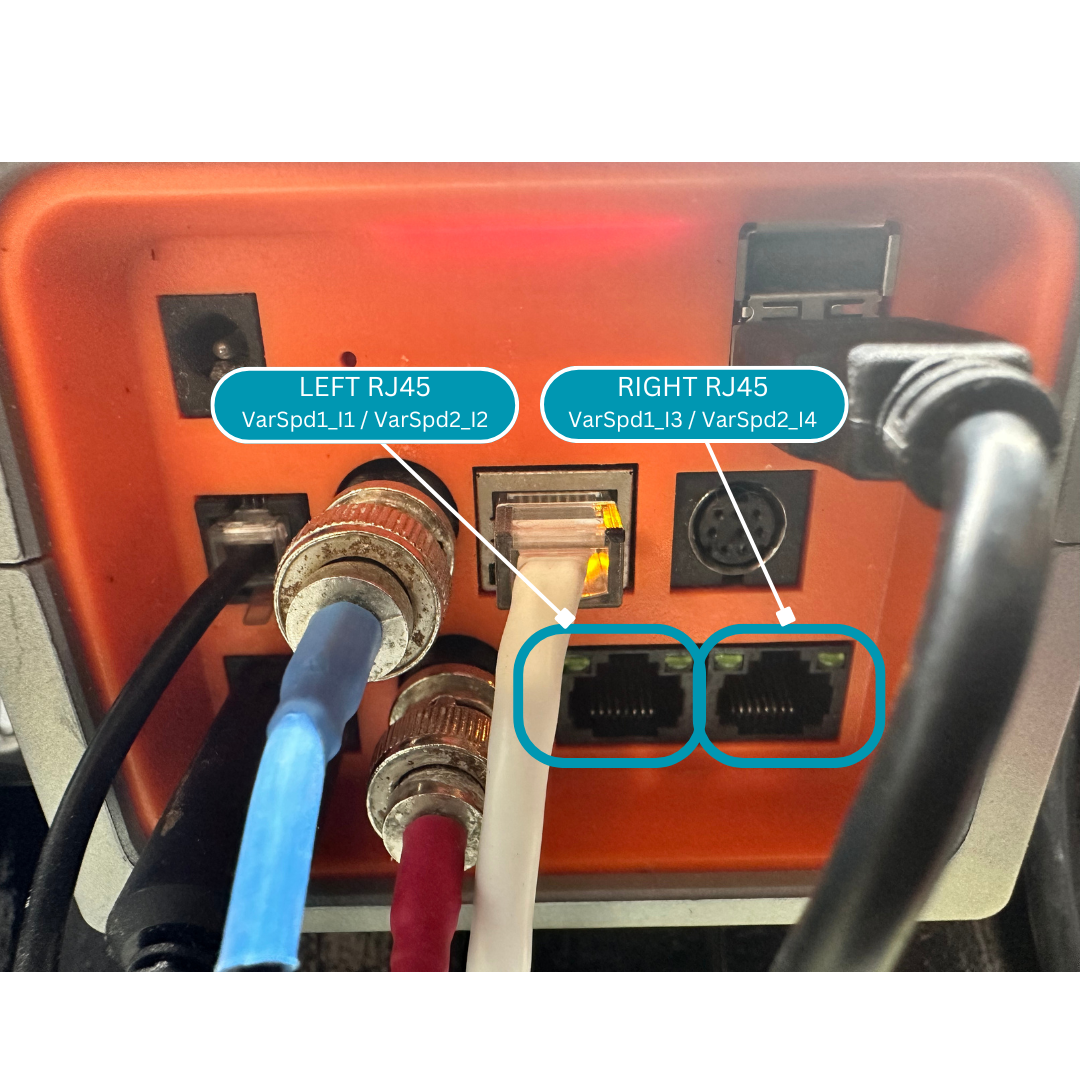 Connect the splitter end of the cable to a variable speed output port on your Apex unit. Refer to your Apex documentation if you are unsure which ports on your unit are variable speed outputs.
Step 4 — Configure the Apex output in Apex Fusion
Depending on which port you have selected, you'll be using a different port in Apex Fusion™.
If you selected the left RJ45 port on the Apex Base Unit, you'll be using VarSpd1_I1 or VarSpd2_I2 in Apex Fusion. If you selected the right RJ45 port on the Apex Base Unit, you'll be using VarSpd3_I3 or VarSpd4_I4.
Step 5 — Program your feed schedule
Create a schedule in Apex Fusion for the output connected to the aF4. Set the output to turn on briefly at your desired feed times — we recommend a 5 minute ON cycle. The aF4 requires 5 minutes between feed cycles.
Example:
Fallback OFF
Set OFF
If Time 18:26 to 18:31 Then ON
Step 6 — Test the connection
With the aF4 powered on, trigger the output manually from Apex Fusion and confirm after waiting 10 seconds:
- The aF4 completes a full feed cycle
*Optional: The link LED on the aF4 flashes green (only on aF4s purchased after March 2026)
If the feed cycle does not trigger, ensure your Apex is fully updated to the latest firmware. Next confirm you have the correct port programmed by copying your code to each of the other ports and trying them 1 by 1.
Once you've completed your desired programming, set the port to "AUTO" on the Fusion dashboard.
Important notes
- The aF4's built-in feed schedule is completely overridden when the link port is connected — do not rely on the internal 24-hour schedule while using Apex control
- The feed quantity dispensed per cycle is still controlled by the aF4's feed quantity setting — adjust this on the unit itself, not in Apex Fusion
- The aF4's temperature settings, auto-clean, and all other functions operate independently of the Apex connection
Troubleshooting
Link LED is not illuminating after connecting the cable
Check that the 3.5mm end is fully seated in the aF4 link port. Try unplugging and reseating the connection.
Feed is not triggering from Apex
Confirm the output port is configured as variable speed and set to 100% when on.
aF4 feeds at unexpected times
Confirm the variable speed port is not sent to "ramp on or off". While the Apex overrides the automatic schedule, double-check Apex Fusion for any conflicting programming on the output. Confirm the port has not been left ON instead of AUTO.
***NOTE*** Ensure your Apex has been fully updated. Customers have noted unpredictable behavior when the firmware on the Apex is old or outdated.
Related articles
- Coralvue Hydros Integration Guide
- Indicator Lights & Sounds Guide — understanding the link LED behaviour
- How to Set Feed Quantity — adjusting how much food dispenses per cycle
Questions about the Apex integration? Submit a support ticket and our team will help.